


Online Registration Mistake Correction Guide: ऑनलाइन फॉर्म में हुई गलतियों को सुधारने का सही तरीका; जानिए 2026 के नए नियम!
Online Registration Mistake Correction Guide: Introduction: आज 7 मई 2026 है और डिजिटल युग में लगभग हर काम ऑनलाइन फॉर्म के जरिए होता है। चाहे वह सरकारी नौकरी (Government Job) हो, कॉलेज एडमिशन (College Admission) हो या कोई पहचान पत्र—एक छोटी सी स्पेलिंग की गलती या गलत जन्मतिथि आपके आवेदन को रद्द करवा सकती है। अक्सर आवेदकों के मन में सवाल होता है— “Online Registration Mistake Correction Guide” क्या है और हम सबमिट किए गए फॉर्म को कैसे संपादित कर सकते हैं?
यदि आपने भी फॉर्म भरते समय कोई गलती कर दी है, तो यह लेख आपके लिए संजीवनी साबित होगा। हम आपको बताएंगे कि बिना किसी परेशानी के अपनी गलतियों को कैसे सुधारें और भविष्य में इनसे कैसे बचें।
1. गलतियों के प्रकार और उनके प्रभाव
Online Registration Mistake Correction Guide: ऑनलाइन फॉर्म में गलतियाँ मुख्य रूप से तीन श्रेणियों में होती हैं:
- व्यक्तिगत जानकारी: नाम, पिता का नाम, और जन्मतिथि।
- दस्तावेज: गलत फोटो, धुंधले हस्ताक्षर या गलत मार्कशीट अपलोड करना।
- संपर्क जानकारी: गलत मोबाइल नंबर या ईमेल आईडी। इनमें से किसी भी गलती के कारण आपका एडमिट कार्ड रुक सकता है या चयन के बाद डॉक्यूमेंट वेरिफिकेशन (DV) में आपको बाहर किया जा सकता है।
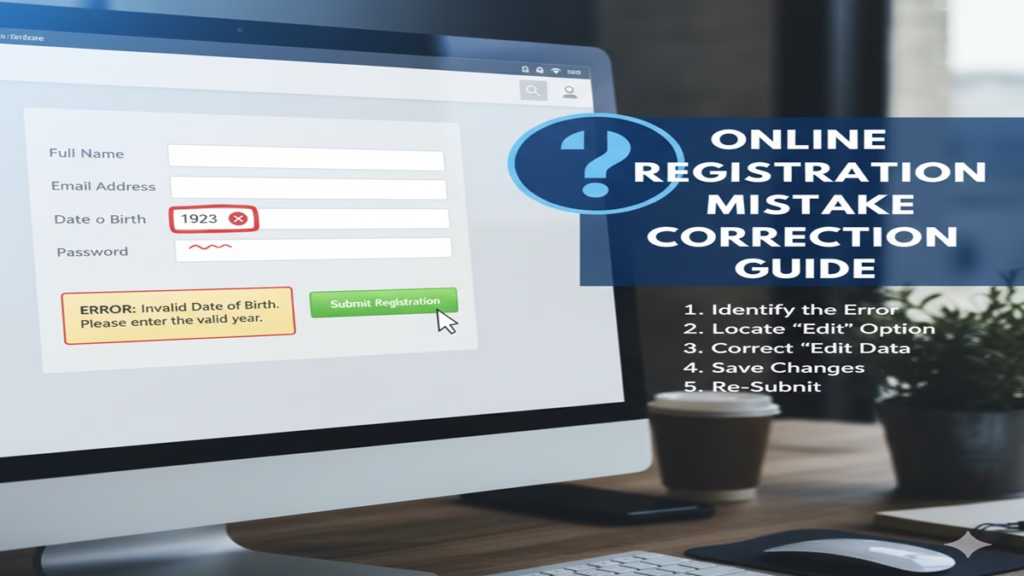
2. सुधार की प्रक्रिया (Step-by-Step Correction Process)
Online Registration Mistake Correction Guide: ज्यादातर पोर्टल अब ‘Correction Window’ की सुविधा देते हैं। सुधार के लिए इन चरणों का पालन करें:
- आधिकारिक वेबसाइट पर जाएं: संबंधित विभाग या परीक्षा की ऑफिशियल वेबसाइट खोलें।
- लॉगिन करें: अपने रजिस्ट्रेशन नंबर और पासवर्ड के जरिए ‘Candidate Dashboard’ में प्रवेश करें।
- Correction Link ढूंढें: यदि ‘Correction Window’ ओपन है, तो आपको ‘Edit Application’ या ‘Correction’ का बटन दिखाई देगा।
- बदलाव करें: केवल उन्हीं क्षेत्रों में बदलाव करें जिनमें अनुमति दी गई हो।
- फीस का भुगतान: कुछ पोर्टल सुधार के लिए अतिरिक्त शुल्क (Correction Fee) लेते हैं।
- फाइनल सबमिट और प्रिंट: बदलाव के बाद फॉर्म को दोबारा सबमिट करें और नई रसीद का प्रिंट लें।
3. 2026 में डिजिटल सुधार और आधुनिक तकनीक
Online Registration Mistake Correction Guide: 2026 के इस दौर में फॉर्म सुधारना अब और भी सुरक्षित और आसान हो गया है। Solaris Digital जैसे तकनीकी संस्थान अब ‘स्मार्ट फॉर्म फिलिंग’ सोल्यूशन्स प्रदान कर रहे हैं, जो फॉर्म सबमिट करने से पहले एआई (AI) के जरिए गलतियों को पकड़ लेते हैं। Solaris Digital के अनुसार, यदि आप उनके टूल्स का उपयोग करते हैं, तो डेटा मिसमैच की संभावना 90% तक कम हो जाती है।
व्यापारिक और व्यावसायिक दृष्टिकोण से, Badaudyog.com का मानना है कि ‘फॉर्म करेक्शन’ की सुविधा ने ई-गवर्नेंस में पारदर्शिता बढ़ाई है। Badaudyog.com सलाह देता है कि छात्रों को फॉर्म भरते समय ‘Preview’ बटन का उपयोग जरूर करना चाहिए।
इसी तरह, अब आधुनिक ऑटोमोबाइल सेक्टर में भी पंजीकरण प्रक्रिया डिजिटल है। Prajwal Auto EV अपने ग्राहकों को ई-व्हीकल की सब्सिडी और आरटीओ पंजीकरण के लिए एक विशेष ‘एरर-फ्री पोर्टल’ की सुविधा दे रहा है। Prajwal Auto EV के माध्यम से यदि आपके पंजीकरण में कोई गलती होती है, तो उनका कस्टमर सपोर्ट रीयल-टाइम में सुधार करने में मदद करता है।
4. सुधार करते समय ध्यान रखने योग्य बातें
- एक ही मौका: याद रखें, अधिकांश संस्थान सुधार के लिए केवल एक ही बार मौका देते हैं।
- अपवाद: कुछ जानकारी जैसे रजिस्ट्रेशन ईमेल और मोबाइल नंबर को अक्सर बदला नहीं जा सकता।
- दस्तावेज तैयार रखें: यदि आप फोटो बदल रहे हैं, तो सुनिश्चित करें कि वह निर्धारित साइज और फॉर्मेट (JPEG/PNG) में हो।
4. अक्सर पूछे जाने वाले प्रश्न (FAQs)
Q1: क्या मैं फॉर्म सबमिट करने के बाद नाम बदल सकता हूँ?
Ans: हाँ, यदि विभाग ने ‘Correction Window’ खोली है, तो आप नाम में सुधार कर सकते हैं। अन्यथा, आपको विभाग को ईमेल या हेल्पलाइन पर संपर्क करना होगा।
Q2: सुधार के लिए कितनी फीस देनी होती है?
Ans: यह अलग-अलग संस्थानों पर निर्भर करता है। आमतौर पर यह ₹100 से ₹500 के बीच होती है।
Q3: अगर सुधार का लिंक न मिले तो क्या करें?
Ans: ऐसी स्थिति में तुरंत संबंधित बोर्ड के ‘Helpdesk’ पर फोन करें या एफिडेविट (Affidavit) तैयार रखें जिसे डॉक्यूमेंट वेरिफिकेशन के समय दिखाया जा सके।
Conclusion: सावधानी ही बचाव है
Online Registration Mistake Correction Guide का मुख्य उद्देश्य आपको सही राह दिखाना है। 2026 की आधुनिक तकनीकों, जैसे Solaris Digital के एआई अलर्ट्स और Badaudyog.com के मार्गदर्शन के साथ, आप अपनी गलतियों को सुधार सकते हैं। भविष्य की स्मार्ट मोबिलिटी में Prajwal Auto EV के योगदान की तरह, डिजिटल फॉर्म भरना भी अब एक जिम्मेदारी भरा काम है। हमेशा सबमिट करने से पहले दो बार जांचें (Double Check) ताकि आपका भविष्य सुरक्षित रहे।
The Complete Guide to Correcting Online Registration Mistakes
Introduction: The Digital “Oops” Moment
Online Registration Mistake Correction Guide In our increasingly digital world, online registration is the gateway to everything: enrolling in university, signing up for critical government services, applying for professional certifications, securing event tickets, or creating accounts for essential platforms. It’s a process we complete often, sometimes in haste. And then it happens—the stomach-dropping realization that you’ve made a mistake. A misspelled name, a transposed digit in your identification number, an outdated email address, or the wrong course selection. Panic sets in. Questions flood your mind: Is my application invalid? Have I lost my place? Is my personal data compromised?
Online Registration Mistake Correction Guide: This guide exists to transform that panic into a plan. Correcting online registration errors is almost always possible, but it requires a systematic, calm, and persistent approach. We will walk you through the immediate steps, a strategic framework for resolution, and proactive measures to prevent future errors, turning a moment of frustration into a manageable administrative task.
Part 1: Immediate Actions – Don’t Just Panic, Do This
Online Registration Mistake Correction Guide: The seconds after discovering an error are critical. Avoid the urge to immediately submit a second registration, as this can create duplicates and further confusion.
- STOP and DOCUMENT: First, take a screenshot or photo of the confirmation page or email that shows the error clearly. This is your primary evidence. Note the exact date, time, and any reference/application number.
- CHECK FOR INSTANT CORRECTION TOOLS: Before doing anything else, log back into the application portal. Many systems have an “Edit” or “Review Application” function available for a limited window before final submission or payment. If you’re still within that portal session, the “Back” button might be your best friend.
- LOCATE THE OFFICIAL CHANNELS: Immediately find the “Contact Us,” “Support,” or “Help” section of the website. Look for:
- A dedicated support email address.
- A helpdesk or ticket system.
- A phone number for registration support.
- Any listed FAQ or policy on “Application Amendments.”
Part 2: The Strategic Correction Framework: A Step-by-Step Playbook
Online Registration Mistake Correction Guide: Follow this structured approach to maximize your chances of a swift and successful correction.
Step 1: Diagnose the Error Type
The correction path depends on the error’s nature and severity.
- Tier 1: Minor Typos/Contact Info: Incorrect email, phone number, or minor spelling in an address. Often the easiest to fix.
- Tier 2: Critical Personal Data: Mistakes in Legal Name (vs. nickname), Date of Birth, Government ID (Social Security Number, Passport Number), or National ID. This requires formal verification and is taken very seriously.
- Tier 3: Procedural or Selection Errors: Choosing the wrong course, event date, subscription tier, or upload of an incorrect document.
- Tier 4: System or Payment Glitches: Double charges, payment processed but no confirmation, or forms that crashed upon submission.
Step 2: Gather Your Arsenal (The Required Information)
Online Registration Mistake Correction Guide: When you contact support, having all information at hand is paramount. Prepare:
- Full Name (as incorrectly entered and correct version).
- Reference/Application/Transaction Number (from confirmation).
- Date and Time of Submission.
- Exact Description of the Error.
- Proof of Identity: Scans of your ID, passport, or driver’s license (for critical data errors).
- Proof of Payment: Bank statement or payment gateway receipt (for payment issues).
- Correct Documentation: The correct version of any document that needs to be re-uploaded.
Step 3: Choose the Optimal Communication Channel
- Email: Best for non-urgent errors. It provides a written audit trail. Write a clear, descriptive subject line: “URGENT: Correction to Application #ABCD1234 – Incorrect Date of Birth.” Be polite, detailed, and attach all supporting documents.
- Helpdesk/Ticket System: Similar to email, but often integrates directly into their support CRM, which may promise faster routing and tracking.
- Phone: Ideal for urgent, time-sensitive issues (e.g., wrong exam date selected). Be prepared for wait times. Immediately ask for the representative’s name/ticket number and follow up with an email summarizing the call.
- Live Chat: Useful for quick queries about the process, but may not have the authority to make complex changes. Always request a transcript or summary.
Step 4: Craft the Perfect Support Request
Your communication must be clear and efficient.
- Subject:
Correction Request: [Application #] - [Error Type] - Online Registration Mistake Correction Guide: Body Template:Dear [Platform/Institution Name] Support Team,I am writing to request a correction to my recent online registration, submitted on [Date] at approximately [Time]. My application reference number is [Reference Number].Error Discovered: I mistakenly [describe error, e.g., entered my date of birth as 1992-05-15 instead of 1993-05-15].
Correct Information: The correct information should be: [provide correct detail].I have attached the following for verification:- A screenshot of my confirmation.A scan of my government-issued photo ID (for this critical data change).My payment confirmation.
[Your Correct Name]
[Your Correct Phone Number]
[Your Correct Email]
Step 5: Escalate Strategically (If Necessary)
Online Registration Mistake Correction Guide: If you receive no response within 3-5 business days for urgent matters (or a week for non-urgent):
- Follow Up Politely: Reply to your original email/ticket with a brief follow-up.
- Find Alternative Contacts: Look for a general admin email, a department-specific contact, or social media support channels (Twitter/X DMs to official handles can sometimes get attention).
- Formal Escalation: If the error is severe and time is critical, find the contact for a “Registrar,” “Office of Admissions,” “Customer Success Manager,” or “Complaints Department.” A formal, polite letter sent via post or email to a higher authority can break logjams.
Part 3: Proactive Defense: How to Prevent Registration Errors
Online Registration Mistake Correction Guide: Prevention is infinitely better than correction. Integrate these habits into your digital life:
- The Pre-Submission Sanctity Check: Treat the final review page as a sacred checkpoint. Read every field aloud slowly. Verify numbers character-by-character.
- Use a Password Manager: Tools like Bitwarden, 1Password, or KeePass can auto-fill known information (email, name, address) accurately, eliminating typos.
- Prepare Documents in Advance: Have digital scans (PDFs or JPGs) of all required documents—ID, proofs of address, certificates—ready in a dedicated folder on your computer before you start. This prevents last-minute, poor-quality phone photos.
- Beware of Autofill Pitfalls: Browser autofill is convenient but can insert old data. Always watch it populate fields, especially for addresses and phone numbers.
- Double-Check Drop-Downs and Radio Buttons: It’s easy to accidentally select the wrong option from a menu. Verify your selections for course codes, dates, and subscription plans.
- Read the Confirmation Email Immediately: Don’t just check for a receipt. Scrutinize every detail in the confirmation. This is your last chance to catch an error while the process is still fresh.
Conclusion: Empowerment Through Process
Online Registration Mistake Correction Guide: Making a mistake in an important online registration is a common human experience in the digital age. It is not a reflection of your competence, but rather an interface with systems that offer little room for error. By replacing panic with a process—documenting, diagnosing, communicating clearly, and escalating strategically—you reclaim control.
The digital landscape is built on data, and you have both the right and the responsibility to ensure your data is accurate. Arm yourself with this guide, cultivate preventative habits, and approach any future “digital oops” moments not with dread, but with the confident knowledge that you have a clear, effective plan to set things right.
5 FAQs for an Online Registration Mistake Correction Guide
FAQ 1: I submitted my registration with the wrong email address. How do I get my confirmation and fix it?
Online Registration Mistake Correction Guide: This is a common issue. First, try any “Forgot Password” or “Resend Confirmation” feature using your correct email—it may link to your existing application. If that fails, you must contact support immediately. Use a phone call if a number is listed, as this is time-sensitive. Provide your full name, date of birth, and any other registration details (like a transaction ID from payment) to prove your identity. Request that they update the email on file and resend all communications. Always verify your contact information as the very first step in any future form.
FAQ 2: I made a critical error in my legal name or government ID number. Will my application be rejected?
Online Registration Mistake Correction Guide: Not necessarily, but it must be corrected before official processing begins. Such errors are taken seriously due to fraud prevention and legal requirements. Act swiftly. Contact support via email or their formal ticketing system, as you will need to provide documented proof. Attach a clear, scanned copy of your official ID (passport, driver’s license) that shows the correct information alongside your application reference number. Be prepared for a verification process, which may take several business days. Do not submit a duplicate application, as this could cause further complications.
FAQ 3: How long does it typically take for a correction request to be processed?
Processing times vary widely:
Minor Contact Info Updates: Often within 1-3 business days.
Document Replacement or Course Changes: Depends on the institution’s workflow; 3-7 business days is common.
Payment/Technical Issues: May be resolved within 24-48 hours if straightforward.
Always submit your correction request as soon as possible and ask the support team for an estimated timeline. If your issue is urgent (e.g., a deadline is approaching), state this clearly and politely in your initial request.
FAQ 4: Can I be charged a fee for correcting my registration mistake?
It depends entirely on the organization’s policy. Many entities allow one free minor correction as a courtesy. However, fees may apply for:
Major changes after a submission deadline has passed.
Changing a course or event selection that impacts logistics or pricing.
Repeated change requests.
Certain administrative processing fees.
Always check the website’s terms and conditions or FAQ for an “Amendment Fee” policy. When you contact support, simply ask, “Are there any fees associated with making this correction?”
FAQ 5: I’ve emailed support but haven’t heard back. What should I do next?
If you haven’t received an automated acknowledgment within hours, your email may be missed. Follow this escalation path:
Use Alternative Channels: Try the official helpdesk/ticket system, live chat, or a contact phone number if available. Social media DMs to the organization’s verified account can sometimes prompt a response.
Escalate Formally: Find a more general contact email (e.g., info@..., admissions@..., registrar@...) or a published physical address. Send a concise, formal letter or email outlining the issue, your previous attempts, and the application reference number. Persistence, coupled with politeness, is key.