


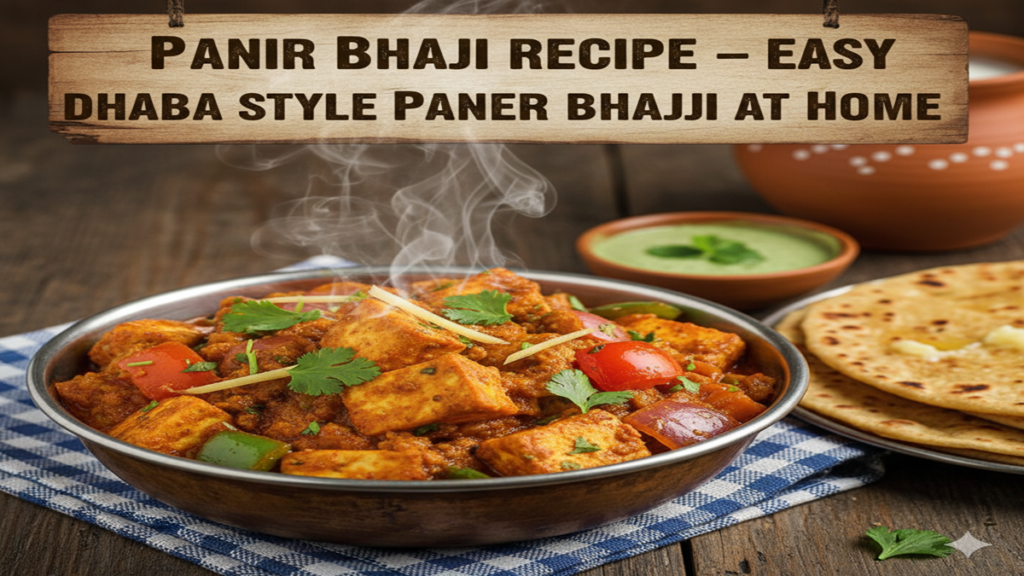
Paneer Bhaji Recipe in Marathi: हॉटेलसारखी दाटसर आणि चमचमीत पनीर भाजी बनवण्याची सर्वात सोपी पद्धत!
Panir Bhaji Recipe in Marathi: Introduction: भारतीय जेवणात पनीरला (Paneer) एक विशेष स्थान आहे. शाकाहारी लोकांसाठी पनीर हा प्रथिनांचा (Protein) उत्तम स्त्रोत आहे. घरी पाहुणे येणार असोत किंवा काहीतरी खास खाण्याची इच्छा असो, सर्वांच्या मनात पहिला विचार येतो तो म्हणजे ‘पनीर भाजी’.
अनेकदा आपण हॉटेलमध्ये गेल्यावर पनीर मसाला किंवा पनीर लबाबदार ऑर्डर करतो, पण तशीच चव घरी येत नाही. आजच्या या लेखात आपण Paneer Bhaji Recipe in Marathi सविस्तर पाहणार आहोत, जेणेकरून तुम्ही घरच्या साहित्यात हॉटेलपेक्षाही चविष्ट भाजी बनवू शकाल.
१. पनीर भाजीसाठी लागणारे साहित्य (Ingredients)
Panir Bhaji Recipe in Marathi: हॉटेलसारखी चव मिळवण्यासाठी योग्य प्रमाणात साहित्य असणे गरजेचे आहे:
- पनीर: २५० ग्रॅम (चौकोनी तुकडे केलेले).
- कांदा: २ मध्यम (बारीक चिरलेले).
- टोमॅटो प्युरी: २ मोठ्या टोमॅटोची पेस्ट.
- आले-लसूण पेस्ट: १ मोठा चमचा.
- खडे मसाले: तेजपत्ता, दालचिनी, लवंग, हिरवी वेलची.
- मसाले: लाल तिखट (२ चमचे), हळद (अर्धा चमचा), धने पावडर (१ चमचा), गरम मसाला (१ चमचा).
- काजू पेस्ट: ८-१० काजू भिजवून केलेली पेस्ट (भाजीला दाटसरपणा येण्यासाठी).
- तेल/लोणी: गरजेनुसार.
- कसुरी मेथी आणि कोथिंबीर: सजावटीसाठी.
२. कृती: स्टेप-बाय-स्टेप गाईड (Step-by-Step Method)
Panir Bhaji Recipe in Marathi: Step 1: पनीर तयार करणे पनीरचे तुकडे हलके सोनेरी होईपर्यंत तेलात तळून घ्या. तळल्यानंतर पनीर लगेच कोमट पाण्यात टाका, यामुळे पनीर मऊ (Soft) राहते.
Step 2: ग्रेव्हीचा मसाला तयार करणे एका कढईत तेल गरम करा. त्यामध्ये खडे मसाले टाका. आता बारीक चिरलेला कांदा घालून तो गुलाबी होईपर्यंत परता. त्यानंतर आले-लसूण पेस्ट टाकून कच्चा वास जाईपर्यंत परता.
Step 3: टोमॅटो आणि मसाले आता यामध्ये टोमॅटोची प्युरी टाका. तेल सुटेपर्यंत मसाला परतावा. त्यानंतर हळद, तिखट, धने पावडर घालून मिक्स करा.
Step 4: सिक्रेट घटक – काजू पेस्ट भाजीला हॉटेलसारखी ‘रिच’ चव देण्यासाठी यामध्ये काजूची पेस्ट आणि थोडे दही (ऐच्छिक) टाका. यामुळे ग्रेव्ही दाटसर आणि क्रीमयुक्त होते.
Panir Bhaji Recipe in Marathi: Step 5: पनीर मिक्स करणे मसाला छान शिजल्यावर त्यामध्ये पनीरचे तुकडे आणि अर्धा पेला गरम पाणी टाका. चवीनुसार मीठ घालून ५ मिनिटे मंद आचेवर शिजवा.
Step 6: फिनिशिंग टच शेवटी कसुरी मेथी हातावर चोळून टाका आणि भरपूर कोथिंबीर घालून गॅस बंद करा. तुमची गरमागरम Paneer Bhaji तयार आहे!
३. उत्तम पनीर भाजीसाठी काही खास टिप्स (Cooking Tips)
- Panir Bhaji Recipe in Marathi: गरम पाण्याचा वापर: ग्रेव्हीमध्ये नेहमी गरम पाणीच वापरा, यामुळे भाजीला चांगली तररी येते.
- ताजे पनीर: नेहमी ताजे आणि मऊ पनीर वापरा. जर पनीर कडक असेल, तर कोमट पाण्यात ५ मिनिटे ठेवा.
- कसुरी मेथी: हॉटेलसारखा सुगंध हवा असेल तर कसुरी मेथी कधीही विसरू नका.
४. सतत विचारले जाणारे ५ प्रश्न (FAQs)
Q1: पनीरची भाजी मऊ कशी करावी?
Ans: पनीर तळून घेतल्यावर ते लगेच कोमट पाण्यात २ मिनिटे ठेवा, यामुळे ते रबरासारखे कडक होत नाही.
Q2: हॉटेलसारखी ग्रेव्ही लाल कशी दिसते?
Ans: यासाठी तुम्ही कश्मीरी लाल तिखट वापरावे, ज्यामुळे भाजीला रंग छान येतो पण ती जास्त तिखट होत नाही.
Q3: पनीरच्या भाजीत काजू पेस्ट ऐवजी काय वापरू शकतो?
Ans: तुम्ही मगज बी (Melon Seeds) ची पेस्ट किंवा दुधाची साय (Fresh Cream) देखील वापरू शकता.
Q4: वजन कमी करण्यासाठी पनीरची भाजी कशी खावी?
Ans: वजन कमी करायचे असेल तर पनीर न तळता वापरा आणि तेलाचे प्रमाण कमी ठेवून भाज्यांचे प्रमाण वाढवा.
Q5: पनीरची भाजी फ्रीजमध्ये किती दिवस टिकते?
Ans: पनीरची भाजी १-२ दिवस फ्रीजमध्ये चांगली राहते, पण ताजी खाणे अधिक आरोग्यदायी असते.
Conclusion: नक्की करून पहा!
Paneer Bhaji ही लहानांपासून मोठ्यांपर्यंत सर्वांना आवडणारी डिश आहे. या रेसिपीचा वापर करून तुम्ही तुमच्या कुटुंबाला हॉटेलसारख्या जेवणाचा आनंद देऊ शकता. पोळी, नान किंवा जिरा राईससोबत ही भाजी अप्रतिम लागते.
Unlocking the Dhaba Secret: Mastering the Ultimate Panir Bhaji at Home
Panir Bhaji Recipe in Marathi: There’s a magic to Indian highway food, a sensory imprint of long journeys punctuated by rustic, smoky flavors. Among the sizzling tawas and simmering kadhais of the iconic dhaba, one dish reigns supreme for its universal appeal: Dhaba Style Paneer Bhaji. This isn’t your typical, creamy restaurant paneer butter masala. This is a rustic, robust, and intensely flavorful curry where spices are king, the gravy clings to the soft paneer, and each bite evokes the spirit of the open road.
Recreating this masterpiece at home is a pursuit of flavor, not complexity. It’s about understanding the why behind each step, transforming simple ingredients into a symphony of taste. This guide will walk you through not just a recipe, but the philosophy of dhaba cooking, ensuring you can conjure that authentic, soul-satisfying experience in your own kitchen.
The Dhaba Cooking Philosophy: More Than Just a Recipe
Panir Bhaji Recipe in Marathi: Before we dive into ingredients, let’s grasp the core principles that define dhaba-style cuisine:
- High Heat Cooking: Dhabas use massive, well-seasoned iron tawas and kadhais over roaring wood or coal fires. This intense, direct heat creates a beautiful char, a smoky undertone, and rapidly concentrates flavors. We’ll mimic this with a heavy-bottomed pan and fearless use of high heat in stages.
- Layered Spicing: Spices aren’t just added; they are bloomed at different stages. Whole spices sizzle in oil first, followed by ground spices cooked until they release their oils. This builds a deep, complex flavor base.
- The “Bhuna” Technique: This is the heart of the dish. Bhunao means to fry and roast the masala paste rigorously until it releases oil and darkens slightly. This step cooks out the raw taste of onions and tomatoes, caramelizes their sugars, and creates a thick, flavorful foundation. Patience here is non-negotiable.
- Panir Bhaji Recipe in Marathi: Rustic Texture: The gravy is not silky-smooth. It has a slight, pleasing texture from coarsely crushed tomatoes or a rough blend. It should coat the paneer, not drown it.
- Panir Bhaji Recipe in Marathi: Generous Use of Oil & Butter: Dhaba food is unapologetically indulgent. Oil and butter aren’t just cooking mediums; they are carriers of flavor and creators of mouthfeel. We’ll use them wisely for authenticity, but feel free to adjust marginally.
Your Toolkit for Dhaba Success
- Panir Bhaji Recipe in Marathi: A Heavy-Bottomed Kadhai or Dutch Oven: This is crucial. It distributes heat evenly, prevents burning during the bhunao, and is the closest to a traditional dhaba kadhai. A thick-bottomed skillet or pot works too.
- A Sturdy Spatula: For all that stirring and scraping during the frying process.
- A Blender or Food Processor: For a coarse paste. A mortar and pestle can be used for a truly rustic texture.
Dhaba Style Paneer Bhaji: The Definitive Recipe
Panir Bhaji Recipe in Marathi: This recipe yields a generous portion for 4-5 people, perfect with buttered tandoori rotis or steamed rice.
Ingredients: The Flavor Foundation
For the Main Curry:
- Panir Bhaji Recipe in Marathi: Paneer: 500 grams, cut into 1.5-inch cubes (use homemade or store-bought, firm variety)
- Oil: 4 tablespoons (mustard oil is traditional and highly recommended for authenticity, but vegetable oil works)
- Butter: 2 tablespoons (adds richness)
- Cumin Seeds: 1.5 teaspoons
- Bay Leaves: 2
- Green Cardamom: 4-5 pods, lightly crushed
- Asafoetida (Hing): A generous pinch (essential for that dhaba digestibility and flavor)
- Onions: 3 large (approx. 400g), roughly chopped
- Ginger: 2-inch piece, roughly chopped
- Garlic: 8-10 cloves
- Green Chilies: 3-4 (adjust to heat preference), slit
- Tomatoes: 4 large (approx. 500g), roughly chopped
- Turmeric Powder: 1 teaspoon
- Kashmiri Red Chili Powder: 1.5 tablespoons (for vibrant color and mild heat)
- Coriander Powder: 2 tablespoons
- Garam Masala: 1.5 teaspoons
- Kasuri Methi (Dried Fenugreek Leaves): 1 tablespoon, crushed between your palms
- Salt: To taste
- Sugar: 1 teaspoon (balances acidity, aids caramelization)
- Water: 1.5 to 2 cups, as needed
- Fresh Coriander: A large handful, finely chopped
For the Final Tempering (Tadka):
- Butter: 1 tablespoon
- Ginger: 1-inch, julienned
- Green Chili: 1, slit
- Panir Bhaji Recipe in Marathi: Kashmiri Red Chili Powder: 1/2 teaspoon (for a final burst of color)
Step-by-Step: The Journey to Flavor
Stage 1: Preparation is Key
- Panir Bhaji Recipe in Marathi: Soak the Paneer: If using store-bought paneer, soak it in hot water with a pinch of salt for 15-20 minutes. This makes it incredibly soft and spongy, allowing it to absorb the gravy later. Drain and set aside.
- Make the Pastes: In a blender, make a coarse paste of the onions, ginger, and garlic with just a little water. Don’t make it a smooth puree. Separately, blend the tomatoes into a coarse puree. Keeping them separate is important for layered cooking.
Panir Bhaji Recipe in Marathi: Stage 2: Building the Base (The Soul of the Dish)
3. Heat the Oil: In your heavy kadhai, heat the oil over medium-high heat. If using mustard oil, let it smoke briefly, then cool slightly to remove its raw pungency.
4. Temper the Whole Spices: Add the cumin seeds, bay leaves, and crushed cardamom. Let them sizzle for 30 seconds. Add the asafoetida and the slit green chilies. Sauté for another 10 seconds.
5. Panir Bhaji Recipe in Marathi: Fry the Onion Paste: Add the coarse onion-ginger-garlic paste. BE CAREFUL, it will splutter. Add the sugar and a pinch of salt. Now, the crucial step: cook this paste, stirring regularly, for 8-10 minutes. You are looking for it to turn a light golden brown, reduce in volume, and the oil should start to separate from the edges. This deep frying (bhunao) of the onions is what creates the sweet, deep base.
Stage 3: The Spice Bloom & Tomato Bhuno
6. Add Dry Spices: Lower the heat to medium. Stir rapidly for 30 seconds to a minute until the raw smell of the spices disappears and they blend beautifully with the fried onion paste. The oil will turn a vibrant red.
7. Panir Bhaji Recipe in Marathi: Incorporate Tomatoes: Pour in the coarse tomato puree. Mix well. Increase the heat back to medium-high. Now, bhuno again! Cook this masala, stirring every minute or so to prevent sticking, for a good 10-12 minutes. You will see it go from bright red and watery to a darker, brick-red shade, thicken significantly, and, most importantly, release oil from the sides. This is the single most important visual cue for doneness. The oil separating signifies the tomatoes are fully cooked and concentrated.
Stage 4: Bringing it All Together
8. Create the Gravy: Add the garam masala and crushed kasuri methi. Stir. Now, add about 1.5 cups of water and salt to taste. Bring this to a vigorous boil. Let it simmer for 3-4 minutes, allowing the gravy to unify.
9. Introduce the Paneer: Gently add the soaked and drained paneer cubes.
Panir Bhaji Recipe in Marathi: Do not stir vigorously at this point to avoid breaking the paneer. Gently shake the kadhai or use a spoon to spoon the gravy over the paneer. Let it simmer on low heat for 4-5 minutes. The paneer will puff up slightly, absorbing the flavors.
10. Finish with Butter & Freshness: Add the 2 tablespoons of butter and half the fresh coriander. Give a gentle stir. The butter will melt into the gravy, creating a beautiful sheen and enriching the mouthfeel.
Panir Bhaji Recipe in Marathi: Stage 5: The Grand Finale – The Tempering
11. The Sizzling Tadka: In a small tadka pan or teaspoon, heat 1 tablespoon of butter. Add the julienned ginger and slit green chili. Let it sizzle for 20 seconds. Turn off the heat and immediately add the 1/2 tsp Kashmiri chili powder—it will sizzle and bloom in the hot butter. Instantly pour this sizzling, fragrant tempering over the finished bhaji.
Panir Bhaji Recipe in Marathi: 12. Garnish & Rest: Sprinkle the remaining fresh coriander. Cover and let the dish rest for at least 20-30 minutes before serving. This resting period is magical—it allows the paneer to fully absorb the gravy, and all the flavors to marry and intensify.
Serving the Dhaba Experience
Panir Bhaji Recipe in Marathi: Serve this glorious Paneer Bhaji piping hot, garnished with an extra dollop of butter if desired. The classic accompaniments are:
- Tandoori Roti or Rumali Roti: To scoop up every last bit of gravy.
- Steamed Basmati Rice or Jeera Rice: A simple, fluffy bed for the flavorful curry.
- A side of sliced onions, lemon wedges, and green chili: For that crunchy, fresh, tangy contrast.
- A glass of Chaas (spiced buttermilk): To cool and aid digestion.
5 Frequently Asked Questions (FAQs)
1. My gravy often tastes sour or has a raw tomato taste. How can I avoid this?
Panir Bhaji Recipe in Marathi: This is the most common issue and points to one mistake: insufficient cooking of the tomato masala. The bhunao (frying/roasting) step is non-negotiable. You must cook the tomato-onion-spice mixture until it transforms:the color darkens from bright red to a deeper brick red, the mixture thickens significantly, and, crucially, you see oil pooling and separating from the edges of the masala. This process can take 12-15 minutes on medium heat. Adding the sugar (1 tsp) also helps balance natural acidity and promotes caramelization.
2. Can I make this gravy ahead of time and add paneer later? Absolutely!
Panir Bhaji Recipe in Marathi: In fact, this is a fantastic meal-prep strategy. You can complete the recipe up to the point where the gravy is simmered (Step 8). Let the gravy cool completely, then store it in an airtight container in the refrigerator for up to 3 days, or freeze it for a month. When ready to serve, reheat the gravy, add a splash of water if too thick, bring to a simmer, and then add fresh paneer (soaked in hot water) and finish with butter and the final tempering. This ensures the paneer stays soft and fresh.
3. My paneer turns out rubbery or doesn’t absorb the gravy. What am I doing wrong?
Panir Bhaji Recipe in Marathi: There are two key tips for perfect paneer:
Always Soak: Never add paneer directly from the packet. Soak cubes in hot (not boiling) salted water for 15-20 minutes. This rehydrates and softens them, making them spongy and ready to soak up the curry.
Gentle, Brief Simmer: Add the paneer at the very end, after the gravy is fully cooked. Let it simmer gently in the hot gravy for just 4-5 minutes. Prolonged boiling will make it tough and chewy. The residual heat after turning off the stove will finish the cooking.
4. I don’t have Kasuri Methi or Kashmiri Chili Powder. What are the best substitutes?
Panir Bhaji Recipe in Marathi: Kasuri Methi: There’s no perfect 1:1 substitute for its unique bitter-herbal aroma. A tiny pinch of dried oregano or marjoram can add a different but pleasant herbal note in a pinch, but it’s best to acquire kasuri methi. It’s widely available and lasts ages.
Kashmiri Chili Powder: Its primary roles are color and mild heat. For color, you can use 1 tsp sweet paprika + 1/2 tsp regular chili powder. For a more authentic Indian flavor, rehydrate 2-3 whole Kashmiri or Byadgi chilies in hot water, blend into a paste, and add it with the tomatoes.
5. How can I make this dish healthier without compromising too much on the authentic dhaba taste?
You can make slight modifications, keeping in mind that some fat is essential for carrying flavors:
Panir Bhaji Recipe in Marathi: Reduce Oil/Butter: Cut both by 25%. Use a good non-stick kadhai to compensate. Avoid eliminating them entirely.
Paneer: Use a low-fat or homemade paneer with toned milk.
Cooking Method: Ensure your pan is properly heated before adding oil. Don’t skip the bhunao, as it develops maximum flavor with the ingredients you have.
Increase Tomatoes/Onions: You can slightly increase the volume of the tomato-onion base to make more gravy with the same amount of paneer, effectively reducing the richness per serving while keeping it satisfying.
Mastering Dhaba Style Paneer Bhaji is a rite of passage for any Indian food enthusiast. It’s a lesson in patience, the alchemy of spices, and the joy of creating something profoundly satisfying. So, fire up your stove, embrace the sizzle, and get ready to transport your senses to the bustling, flavorful world of the dhaba, right from your home kitchen. Happy cooking