


How To Apply New Aadhar Card Online At Home: घर बैठे नए आधार कार्ड के लिए आवेदन कैसे करें? जानिए 2026 की पूरी प्रक्रिया!
How To Apply New Aadhar Card Online At Home : घर बैठे नए आधार कार्ड के लिए आवेदन करें; 2026 की नई प्रोसेस! Dosto, आज के समय में आधार कार्ड (Aadhar Card) सिर्फ एक ID Proof नहीं है, बल्कि यह आपकी फाइनेंशियल लाइफ और सरकारी सुविधाओं की चाबी है। चाहे बैंक अकाउंट खोलना हो या राशन कार्ड बनवाना, आधार के बिना सब अधूरा है।
अक्सर लोग सोचते हैं कि नया आधार कार्ड बनवाने के लिए उन्हें पूरा दिन आधार सेंटर की लंबी लाइनों में बिताना होगा। लेकिन क्या आप जानते हैं कि Digital India के तहत अब आप इसकी आधी से ज्यादा प्रोसेस घर बैठे (At Home) अपने मोबाइल या लैपटॉप से पूरी कर सकते हैं? आज के इस ब्लॉग में हम देखेंगे How To Apply New Aadhar Card Online At Home की स्टेप-बाय-स्टेप जानकारी।
1. क्या नया आधार पूरी तरह ऑनलाइन घर बैठे बन सकता है?
How To Apply New Aadhar Card Online At Home : घर बैठे नए आधार कार्ड के लिए आवेदन करें; 2026 की नई प्रोसेस!यहाँ एक बात समझना जरूरी है: सुरक्षा कारणों और बायोमेट्रिक्स (Biometrics) जैसे कि आपके फिंगरप्रिंट और आंखों के स्कैन (Iris Scan) के लिए आपको एक बार ‘Aadhar Enrollment Center’ जाना ही पड़ता है।
लेकिन, आप घर बैठे Appointment Book कर सकते हैं और Enrollment Form ऑनलाइन भर सकते हैं। इससे आपका फायदा यह होता है कि आपको सेंटर पर जाकर फॉर्म नहीं भरना पड़ता और आपको एक फिक्स समय मिल जाता है, जिससे आपका घंटों का समय बच जाता है।
2. जरूरी दस्तावेजों की लिस्ट (Important Documents)
How To Apply New Aadhar Card Online At Home : घर बैठे नए आधार कार्ड के लिए आवेदन करें; 2026 की नई प्रोसेस! ऑनलाइन फॉर्म भरने से पहले ये कागज अपने पास रखें:
- पहचान का प्रमाण (POI): वोटर आईडी, पैन कार्ड, पासपोर्ट या ड्राइविंग लाइसेंस।
- पते का प्रमाण (POA): बिजली का बिल, राशन कार्ड, या बैंक पासबुक।
- जन्म तिथि का प्रमाण (DOB): जन्म प्रमाण पत्र (Birth Certificate) या 10वीं की मार्कशीट।
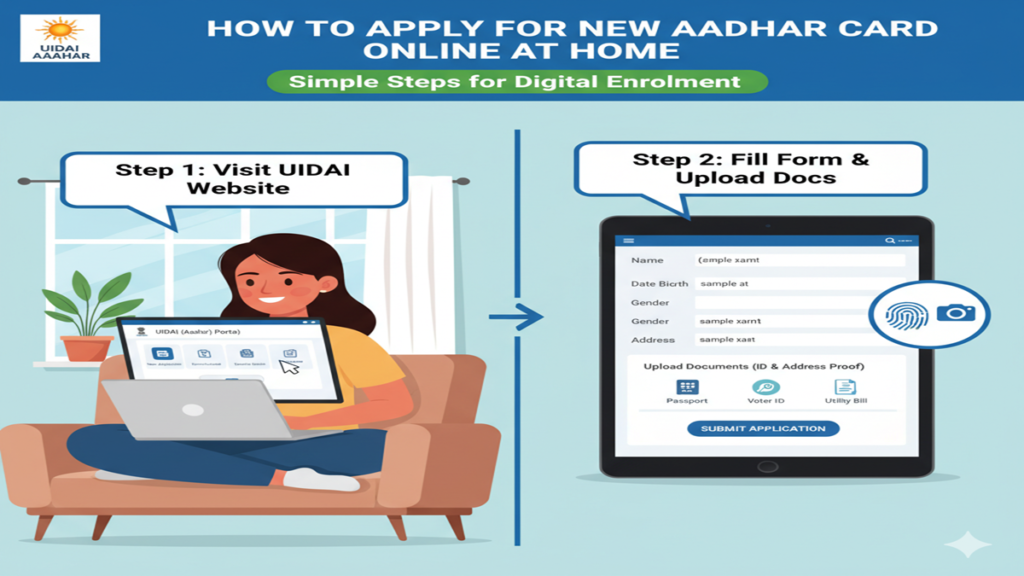
3. Step-by-Step: घर बैठे ऑनलाइन आवेदन कैसे करें?
Step 1: UIDAI की आधिकारिक वेबसाइट पर जाएं सबसे पहले अपने ब्राउज़र में myaadhaar.uidai.gov.in ओपन करें।
Step 2: ‘Book an Appointment’ पर क्लिक करें होमपेज पर आपको यह ऑप्शन दिखेगा। इस पर क्लिक करते ही एक नया पेज खुलेगा जहाँ आपको अपना शहर (City/Location) चुनना होगा।
Step 3: मोबाइल नंबर और OTP वेरिफिकेशन अपना चालू मोबाइल नंबर और स्क्रीन पर दिख रहा कैप्चा कोड डालें। आपके फोन पर एक OTP आएगा, उसे दर्ज करके लॉगिन करें।
Step 4: ‘New Aadhaar’ फॉर्म भरें लॉगिन करने के बाद ‘New Aadhaar’ टैब चुनें। यहाँ आपको अपनी बेसिक जानकारी जैसे नाम, पता, जेंडर और जन्मतिथि भरनी होगी। साथ ही, यह भी चुनें कि आप कौन से डॉक्यूमेंट्स जमा करेंगे।
Step 5: टाइम स्लॉट (Appointment) बुक करें अब आपके सामने एक कैलेंडर खुलेगा। अपनी सुविधा के अनुसार तारीख और समय (Time Slot) चुनें।
Step 6: रिसीप्ट (Appointment Slip) डाउनलोड करें सबमिट करने के बाद आपको एक Appointment Slip मिलेगी। इसे अपने फोन में सेव कर लें या इसका प्रिंट निकाल लें।
4. आधार सेंटर पर आपको क्या करना होगा?
How To Apply New Aadhar Card Online At Home : घर बैठे नए आधार कार्ड के लिए आवेदन करें; 2026 की नई प्रोसेस! चुने हुए समय पर अपने ओरिजिनल डॉक्यूमेंट्स और अपॉइंटमेंट स्लिप के साथ सेंटर पहुंचें:
- वहां आपको लाइन में लगने की जरूरत नहीं होगी। सीधा ऑपरेटर के पास जाएं।
- वो आपके ओरिजिनल कागज चेक करेगा।
- आपके Biometrics (फिंगरप्रिंट और आईरिस स्कैन) लिए जाएंगे।
- एक लाइव फोटो खींची जाएगी।
- आपको एक Acknowledgement Slip दी जाएगी जिसमें आपका EID (Enrollment ID) नंबर होगा।
5. आधार कार्ड स्टेटस और डाउनलोड
How To Apply New Aadhar Card Online At Home : घर बैठे नए आधार कार्ड के लिए आवेदन करें; 2026 की नई प्रोसेस! सेंटर से आने के 10-15 दिनों बाद आप अपनी EID की मदद से UIDAI की वेबसाइट पर स्टेटस चेक कर सकते हैं। आधार जनरेट होने के बाद आप उसे ऑनलाइन डाउनलोड भी कर सकते हैं, और ओरिजिनल आधार कार्ड आपके पते पर पोस्ट के जरिए भेज दिया जाएगा।
6. Top 5 FAQs (Aadhar Card Online Apply)
Q1. नए आधार कार्ड के लिए कितनी फीस लगती है?
Ans: नया आधार कार्ड बनवाना पूरी तरह मुफ्त (Free) है। सरकार इसके लिए कोई चार्ज नहीं लेती।
Q2. क्या बच्चों का आधार भी घर बैठे अप्लाई हो सकता है?
Ans: हाँ, प्रोसेस बिलकुल सेम है। 5 साल से छोटे बच्चों के लिए बायोमेट्रिक्स की जरूरत नहीं होती, केवल उनकी फोटो और माता-पिता के आधार की जरूरत पड़ती है।
Q3. अगर मोबाइल नंबर आधार से लिंक न हो तो क्या करें?
Ans: नए आधार के लिए आप किसी भी मोबाइल नंबर से अपॉइंटमेंट बुक कर सकते हैं। वही नंबर आपके नए आधार में लिंक हो जाएगा।
Q4. अपॉइंटमेंट स्लिप गुम हो जाए तो क्या करें?
Ans: आप वेबसाइट पर जाकर अपने मोबाइल नंबर से फिर से लॉगिन करके स्लिप डाउनलोड कर सकते हैं।
Q5. क्या बिना एड्रेस प्रूफ के आधार बन सकता है?
Ans: अगर आपके पास खुद का एड्रेस प्रूफ नहीं है, तो आप ‘Head of Family’ (HoF) के डॉक्यूमेंट्स का उपयोग करके आधार बनवा सकते हैं।
Conclusion: आज ही अपना समय बचाएं!
How To Apply New Aadhar Card Online At Home की इस प्रक्रिया को अपनाकर आप न केवल एजेंटों के कमीशन से बच सकते हैं, बल्कि सरकारी दफ्तरों के चक्कर काटने से भी बच सकते हैं। डिजिटल बनें और अपना काम स्मार्ट तरीके से करें।
The Ultimate Guide to Applying for a New Aadhaar Card Online From the Comfort of Your Home
Introduction: Your Digital Identity in the Palm of Your Hand
How To Apply New Aadhar Card Online At Home In the digitally transformative landscape of India, the Aadhaar card has evolved from being a simple identity document to the cornerstone of the nation’s biometric identification system. With over 1.3 billion holders, it is the world’s largest digital ID program, seamlessly integrating citizens with government subsidies, financial services, telecom connections, and a myriad of other essential services.
How To Apply New Aadhar Card Online At Home : घर बैठे नए आधार कार्ड के लिए आवेदन करें; 2026 की नई प्रोसेस! While the traditional process involved visiting an Aadhaar Enrolment Centre, the Unique Identification Authority of India (UIDAI) has significantly streamlined the procedure. Now, applying for a new Aadhaar card can be initiated online from your home, though a mandatory physical visit for biometric capture remains a crucial final step. This comprehensive guide of 2000+ words will navigate you through the entire process, demystifying requirements, procedures, and best practices to secure your 12-digit unique identity number.
Chapter 1: Understanding Aadhaar – More Than Just a Card
How To Apply New Aadhar Card Online At Home : घर बैठे नए आधार कार्ड के लिए आवेदन करें; 2026 की नई प्रोसेस! Before embarking on the application journey, it’s vital to understand what Aadhaar is and who is eligible.
What is Aadhaar?
Aadhaar is a 12-digit unique identification number issued by the UIDAI to residents of India, based on their biometric (fingerprints, iris scan) and demographic (name, date of birth, address) data. It is:
- Proof of Identity: Not proof of citizenship.
- Unique: No two residents can have the same number.
- Random: The number itself holds no intelligence or classification based on caste, religion, or geography.
- Portable: A single ID valid across India.
Eligibility for a New Aadhaar:
- Resident of India: Any individual residing in India for 182 days or more in the preceding 12 months.
- All Age Groups: From newborns to senior citizens. For children below 5 years, biometric data is not captured; the child’s Aadhaar is linked to the parent’s/guardian’s Aadhaar. A mandatory biometric update is required when the child turns 5 and again at 15.
Why Apply Online First?
How To Apply New Aadhar Card Online At Home : The “online” segment of the new Aadhaar application refers to the pre-enrolment or booking an appointment process. This proactive step offers significant advantages:
- Time Efficiency: Dramatically reduces waiting time at the enrolment centre.
- Accuracy: Allows you to carefully fill in demographic details in a stress-free environment, minimizing errors.
- Convenience: You choose the appointment slot as per your schedule.
- Preparation: Provides a clear checklist of documents required, ensuring you visit the centre fully prepared.
Chapter 2: Pre-Application Checklist – Getting Your Documents Ready
How To Apply New Aadhar Card Online At Home : A smooth application process hinges on preparation. Before you even go online, gather these documents.
List of Supporting Documents (As per UIDAI):
UIDAI accepts a range of documents as Proof of Identity (POI) and Proof of Address (POA). Many documents like a Passport, Voter ID, or Driver’s Licence serve as both. It is mandatory to carry original documents to the enrolment centre for verification.
- Common Documents (Accepted as Both POI & POA):
- Passport
- Voter ID (EPIC)
- Driving Licence
- PAN Card
- Ration/ PDS Photo Card
- Government Photo ID Cards
- Proof of Identity (POI):
- Bank/Post Office Passbook with Photo
- Photo ID issued by Recognized Educational Institution
- Arms Licence
- Kissan Photo Passbook
- Pensioner Photo Card
- Proof of Address (POA):
- Bank Statement/ Passbook
- Post Office Account Statement/Passbook
- Water/Electricity/Gas Connection Bill (not older than 3 months)
- Credit Card Statement (not older than 3 months)
- Insurance Policy
- Registered Sale/Lease/Rent Agreement
- Letter from Employer (for reputed companies)
- Proof of Date of Birth (DOB):
- Birth Certificate
- SSLC Certificate/ School Leaving Certificate
- Passport
- PAN Card
- Mark sheet from a recognized board/university
- For Children (Baal Aadhaar):
- Birth Certificate
- Aadhaar of any one parent.
Special Considerations:
- If you don’t have a valid POA: You can use the Introducer System or request a resident family member (who has a valid Aadhaar) to give a Address Validation Letter. Templates are available on the UIDAI website.
- Non-Standard Names: In case of a single name, it can be filled in the Surname field, and “FNU” (First Name Unknown) can be written in the Given Name field.
- Document Validity: Ensure documents are not expired or damaged. The name on the documents should ideally match the name you wish to print on your Aadhaar.
Chapter 3: The Step-by-Step Online Pre-Enrolment Process
How To Apply New Aadhar Card Online At Home : This is the core “online at home” component. Follow these steps meticulously.
Step 1: Visit the Official UIDAI Website
- Open your browser and go to the official UIDAI website: https://uidai.gov.in/ or the direct enrolment portal: https://appointments.uidai.gov.in/.
- Crucial Safety Tip: Beware of phishing sites. Always check for the padlock symbol and the correct URL.
- On the UIDAI homepage, hover over the “My Aadhaar” dropdown menu.
- Select “Book an Appointment” or “Locate an Enrolment Centre”. This will redirect you to the appointment booking portal.
Step 3: Locate the Nearest Enrolment Centre
- Enter your State, District, and Sub-District (Taluka).
- You can also search by Pincode or directly by Centre Name if known.
- A list of all Permanent Enrolment Centres (PEC) will appear, displaying their address, contact details, and working hours.
- Select the centre most convenient for you.
Step 4: Book Your Appointment Slot
- How To Apply New Aadhar Card Online At Home : After selecting a centre, you will see a calendar with available dates and time slots.
- Choose a date and time that suits you. Slots are typically available in 15-30 minute intervals.
- Enter your Mobile Number and Email ID. This is critically important as all communication, including the One Time Password (OTP) and enrolment updates, will be sent here.
- Confirm the booking. You will receive an SMS and email with your Appointment ID, date, time, and centre address. Print this appointment slip or save it on your phone.
Alternative: Pre-Enrolment Form Download (Optional but Recommended)
- How To Apply New Aadhar Card Online At Home : Before your appointment, you can download the pre-filled enrolment form.
- On the UIDAI website, under ‘My Aadhaar’, find “Download Pre-filled Enrolment Form” or go directly to the enrolment portal.
- How To Apply New Aadhar Card Online At Home : Enter your Appointment ID to download a PDF form with your basic details already filled.
- Print this form. You can carry this printed form to the centre along with your documents to further speed up the process.
Chapter 4: The Mandatory Visit to the Enrolment Centre
How To Apply New Aadhar Card Online At Home : Despite the online pre-work, this physical visit is indispensable for biometric capture.
What to Carry to the Centre:
- How To Apply New Aadhar Card Online At Home : Appointment Slip (Printout or Digital Copy)
- Pre-filled Enrolment Form (If downloaded)
- Original Supporting Documents (POI, POA, DOB)
- Self-attested Photocopies of all the original documents.
- Mobile Phone (for OTP verification if needed).
Process at the Enrolment Centre:
- How To Apply New Aadhar Card Online At Home : Verification: Submit your documents and forms to the operator. They will verify the originals with the copies.
- Data Entry: The operator will enter your demographic details into the system. You must review them carefully on the screen before proceeding.
- Biometric Capture:
- Fingerprints: All ten fingerprints will be scanned.
- Iris Scan: Both irises will be scanned.
- Photograph: A digital photograph will be taken. (Wear normal clothes, avoid white tops, and ensure your face is clearly visible).
- Acknowledgement Slip: Upon successful data capture, you will receive an Aadhaar Enrolment Slip/ Acknowledgement Slip. This contains:
- Your 14-digit Enrolment Number (EID).
- Date and time of enrolment.
- A QR code.
- Important: This slip is crucial for checking your Aadhaar status and downloading it later. Keep it safe.
Chapter 5: Post-Enrolment – Tracking and Downloading Your Aadhaar
How To Apply New Aadhar Card Online At Home : Your work is almost done. Now, it’s about tracking and receiving your Aadhaar.
1. Checking Aadhaar Status:
- Visit the UIDAI website → “My Aadhaar” → “Check Aadhaar Status”.
- Enter your 28-digit Enrolment ID (EID) from the acknowledgement slip and the security code.
- You can also check using your Registered Mobile Number.
- How To Apply New Aadhar Card Online At Home : The status will show: “Generated”, “Under Process”, or “On Hold” if there are issues.
2. Downloading Your Aadhaar (e-Aadhaar):
- How To Apply New Aadhar Card Online At Home : Once status shows “Generated”, you can download it.
- Go to “Download Aadhaar” on the UIDAI site.
- You can retrieve it using your EID or Aadhaar Number.
- You will need a Password to open the PDF. The password is the first 4 letters of your name (as in Aadhaar) in CAPITAL letters and your year of birth (YYYY). (e.g., RAJU1985).
- Legal Validity: The e-Aadhaar, digitally signed by UIDAI, is equally valid as the physical card for all purposes.
3. Receiving the Physical Aadhaar Letter:
- How To Apply New Aadhar Card Online At Home : UIDAI dispatches the physical letter via India Post to your registered address.
- This can take 2-3 weeks from the date of enrolment.
- If you do not receive it, you can check the “Check Aadhaar PVC Card Status” section or order a reprint for a nominal fee.
4. Updating Details (If You Spot an Error):
- How To Apply New Aadhar Card Online At Home : If you discover any mistake in your name, address, etc., after receiving your Aadhaar, do not re-enroll.
- Use the online “Update Aadhaar” (Self Service Update Portal – SSUP) service to request a correction. This may require document proof and a small fee.
Chapter 6: Troubleshooting and Key Considerations
- How To Apply New Aadhar Card Online At Home : “Biometric Already Exists” Error: This means your fingerprints/iris are already linked to an existing Aadhaar. Do not enrol again. Retrieve your lost Aadhaar using the “Retrieve Lost UID/EID” service.
- Lost Enrolment Slip (EID): You can retrieve it using your registered mobile number on the UIDAI website.
- Mobile Number Not Registered/Changed: A registered mobile number is vital for OTP-based services. If you never provided one or changed your number, visit an Aadhaar Enrolment Centre to update your mobile number.
- How To Apply New Aadhar Card Online At Home : Quality is Key: Ensure your biometrics are captured clearly. Dry or worn-out fingers can cause issues. Moisturize if necessary.
- No Fees for New Enrolment: The process of enrolling for a new Aadhaar is absolutely free of cost at all government-authorized centres.
Frequently Asked Questions (FAQs)
Q1: Can I get an Aadhaar card completely online without any physical visit?
A: How To Apply New Aadhar Card Online At Home : No, it is not possible for a new enrolment. The capture of biometric data (fingerprints, iris scan, and photograph) is a mandatory, in-person security requirement that cannot be done remotely. The online process is for pre-enrolment and appointment booking only. For updates (like address change), a physical visit may be avoided if you have a registered mobile number for OTP authentication.
Q2: I am a newborn’s parent. How do I apply for Baal Aadhaar?
A: How To Apply New Aadhar Card Online At Home : For children below 5 years, you must visit an enrolment centre with the child. Carry the child’s birth certificate and the Aadhaar card of one parent. The child’s biometrics are not captured; only a photograph is taken. A mandatory biometric update is required when the child turns 5.
Q3: What if I don’t have any of the standard Proof of Address (POA) documents?
A: How To Apply New Aadhar Card Online At Home : UIDAI provides alternative solutions:
Introducer System: Authorized enrolment centres have designated Introducers who can verify your identity and address to facilitate your enrolment.
Address Validation Letter: A family member (head of family) who has a valid Aadhaar with the required address can provide a signed address validation letter along with their Aadhaar copy. The template is on the UIDAI website.
Q4: How long does it take to receive the Aadhaar after enrolment?
A: How To Apply New Aadhar Card Online At Home : Typically, your Aadhaar number is generated within 15-30 days of successful enrolment. You can download the e-Aadhaar as soon as the status shows “Generated”. The physical Aadhaar letter is dispatched via India Post and may take an additional 2-3 weeks to reach your postal address.
Q5: I lost my enrolment slip. How can I check my status or download Aadhaar?
A: How To Apply New Aadhar Card Online At Home : You can retrieve your Enrolment ID (EID) by using the “Retrieve Lost UID/EID” service on the UIDAI website. You will need to provide your full name, mobile number/email, and the security code. Once you have the EID, you can proceed to check the status or download your Aadhaar.
Conclusion: Empowering Yourself with Aadhaar
How To Apply New Aadhar Card Online At Home : Applying for a new Aadhaar card has been transformed into a hybrid model that smartly balances convenience with robust security. By leveraging the online pre-enrolment system from home, you, as a resident, take control of the first and most error-prone part of the process. Walking into the enrolment centre prepared not only saves your time but also the system’s resources.
Your Aadhaar is more than a card; it is the key to unlocking the benefits of a digitally empowered India. By following this detailed guide, you ensure that this key is forged accurately and securely, paving the way for seamless access to services and entitlements in your journey as a citizen. Remember, always rely on the official uidai.gov.in website for the most accurate and updated information.